Learn how to create custom notifications within your survey to stay up to date.
Step 1:
- After logging into the system, click on the survey module.
- Now you will see your survey to be edited. Click on the "settings" button.
Step 2:
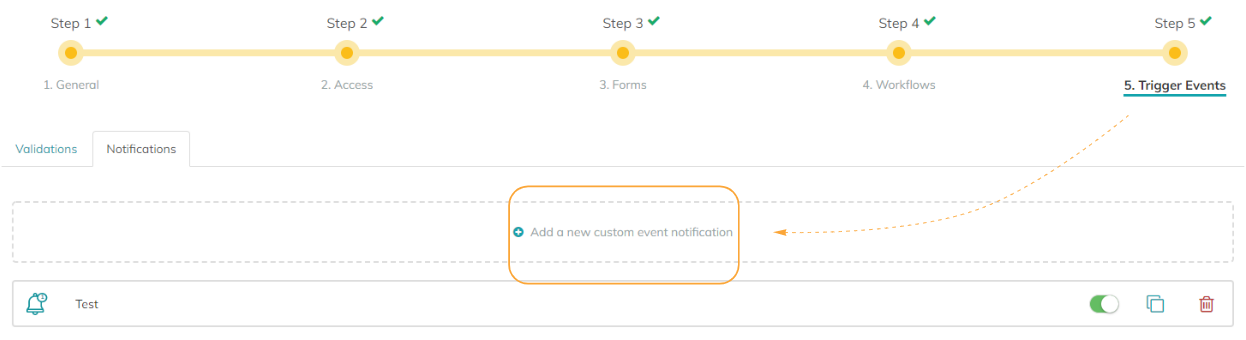
- The editing overview of your survey opens. Now click on "5. Trigger Events".
- To the right of the "Validations" you will find the tab "Notifications". Now click on it.
- An overview of the notifications created so far and a field with the text "Add a new custom event notification" will appear . Click on this field.
Step 3:
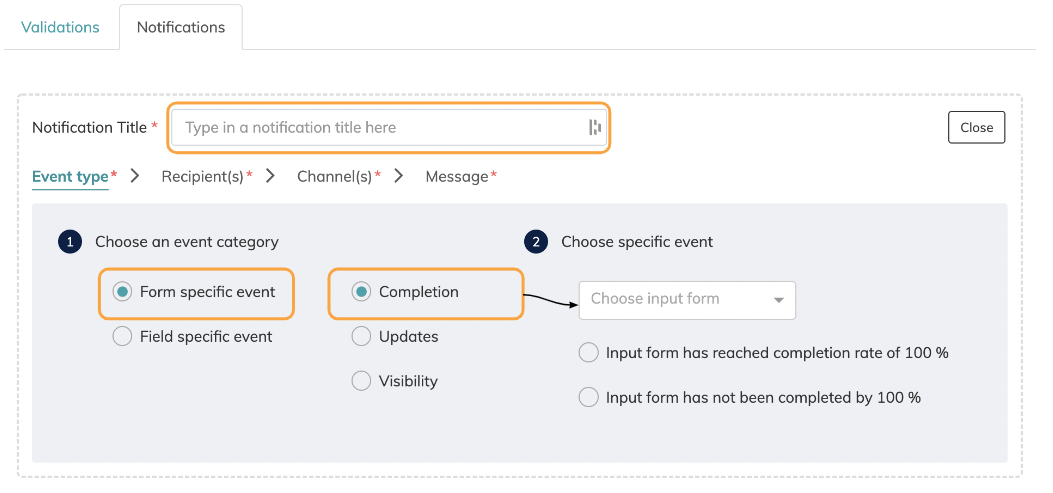
| 1. | Now a field opens again. Here you can enter a title for the notification in the first line. |
⭐ Name your notifications according to a coherent and structured system so that you can quickly find your notifications after they have been created. |
| 2. | You will then need to choose between two different event categories.
|
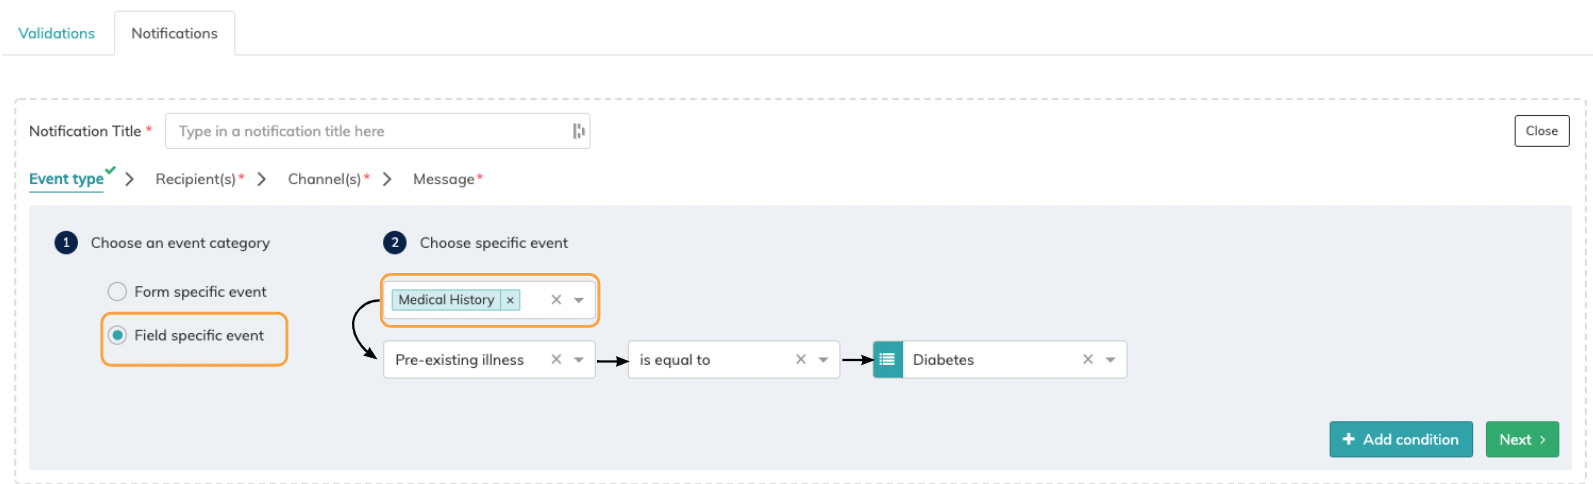
| b. Selecting "Field-specific event" will allow you to set a field-specific notification. First select the input form in which the field was inserted. Then select the respective field (e.g. Pre-existing illness). Then you can select a comparison type (e.g. is equal to) and then enter the desired property, such as a specific value (e.g. Diabetes). |
| 3. | After you have specified the event type, click on the green "Next" button at the bottom on the right. You will be redirected to the next tab. |
| 4. | Under "Recipient(s)" you can now specify who should receive the notification. You can select the assignee and/or specific role(s) (e.g. monitor). If you select a certain role and add another person with this role to you study at a later point in time, this person will also receive the notifications triggered from this point in time. This also applies to a change of the assignee. Read more about the topic "update assignee" in this article: How can I enroll new subjects into my study? ⚠️ Please note that you can only select the people who have access to your instance. |
⭐ Who is an assignee? When enrolling subjects into a the survey you can assign the subject to a specific person. E.g. someone who is "responsible" for the subject. |
| 5. | In the "Channel(s)" category, you can now decide how the notification should be sent. |
| a. If you select "in Climedo", the notification will appear in the top right corner of your site . | |
| b. The other possibility is via email. In this case, you will receive an email from product.support@climedo.de as soon as the trigger is set. Here's what a notification email could look like. |
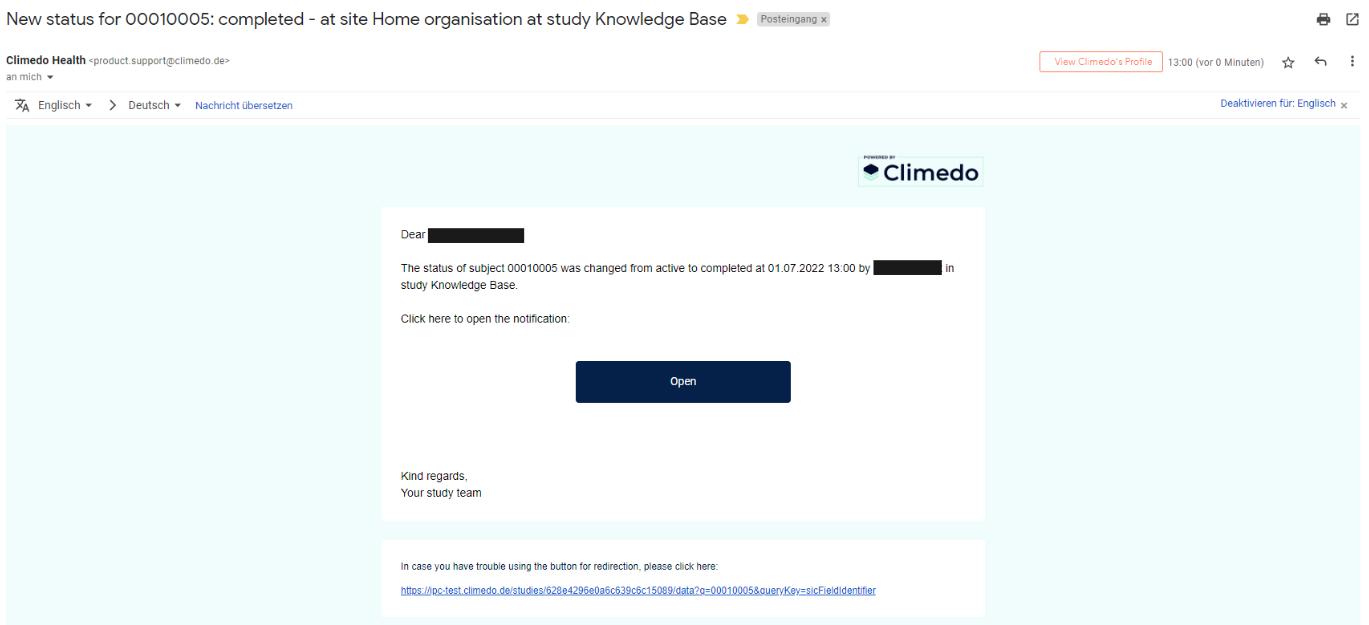
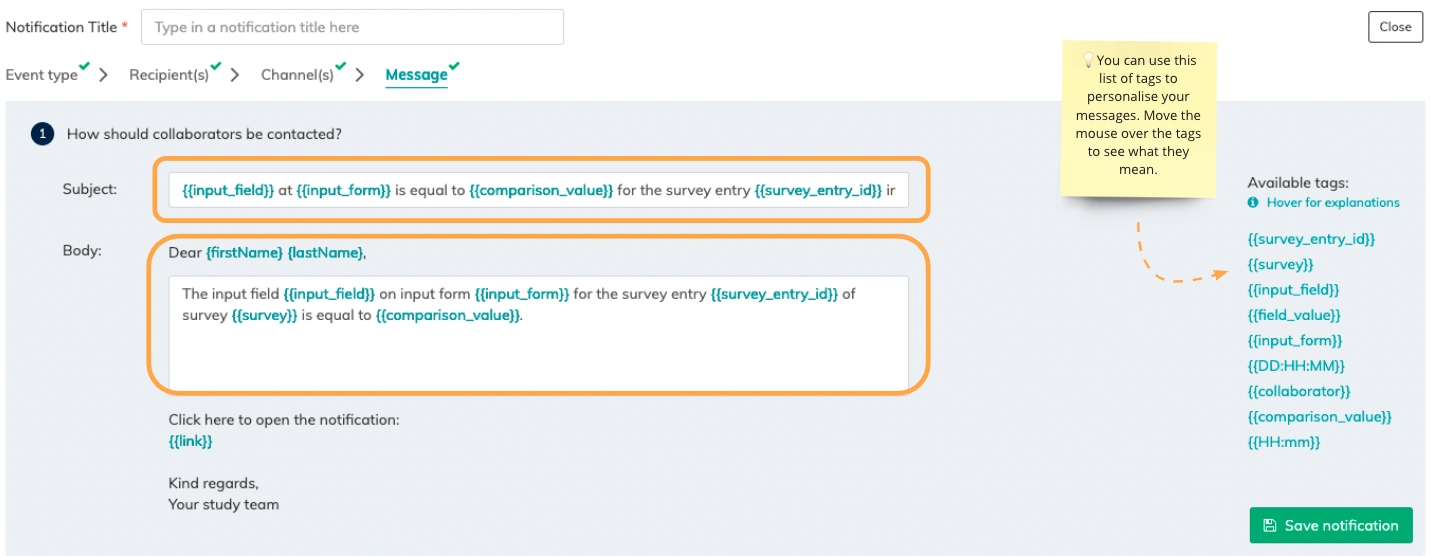
| 6. | Last but not least, you can personalize your message in the next tab ("Message"). You can use dynamic text variables as shown in curly brackets in the screenshot and in the box next to it. |
| 7. | Now you can click on the green button "Save notification". (Reminder: Don't forget to save your changes again on the top on the right ("Save"). |
Note that the person who triggered the notification in the eCRF will not receive a notification (important for UAT). |
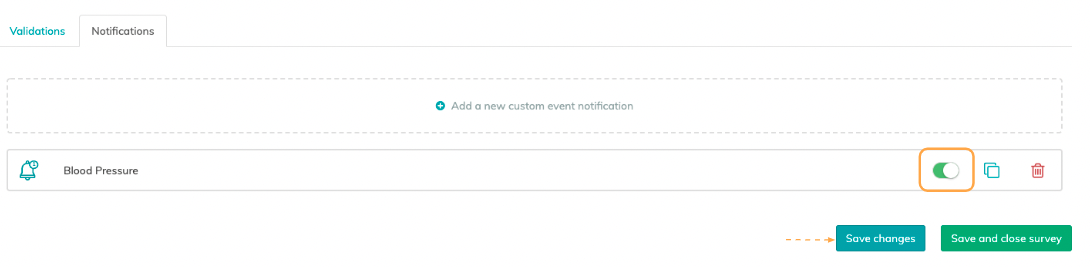
Finally, you will be taken back to your overview of Notifications. You can toggle or untoggle your notification, e.g. when you are still testing you may want to untoggle first. Don't forget to save your changes at the end!
Adding conditions
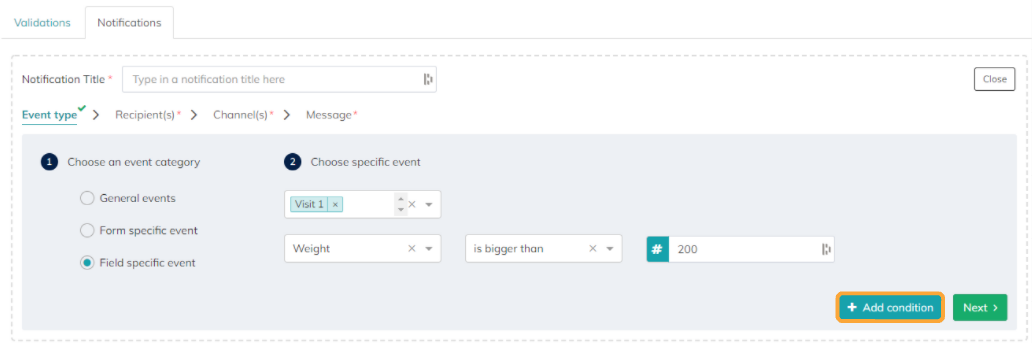
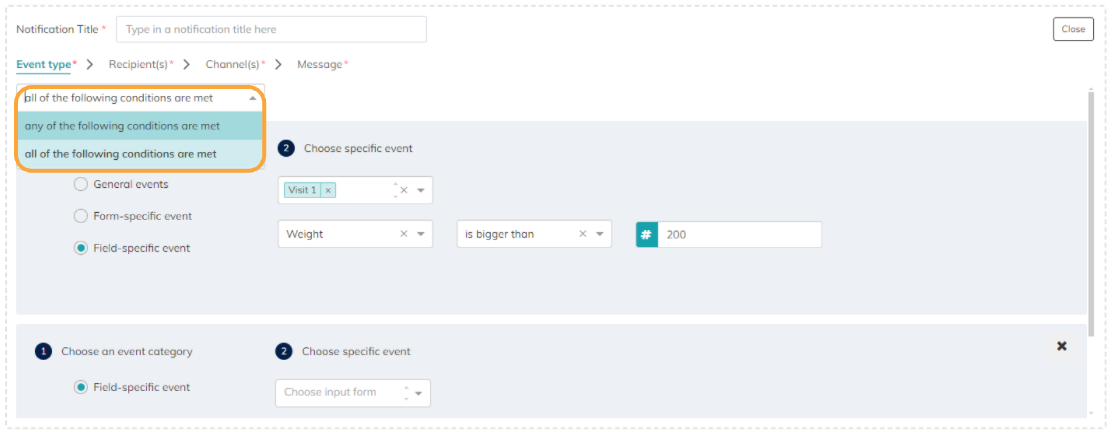
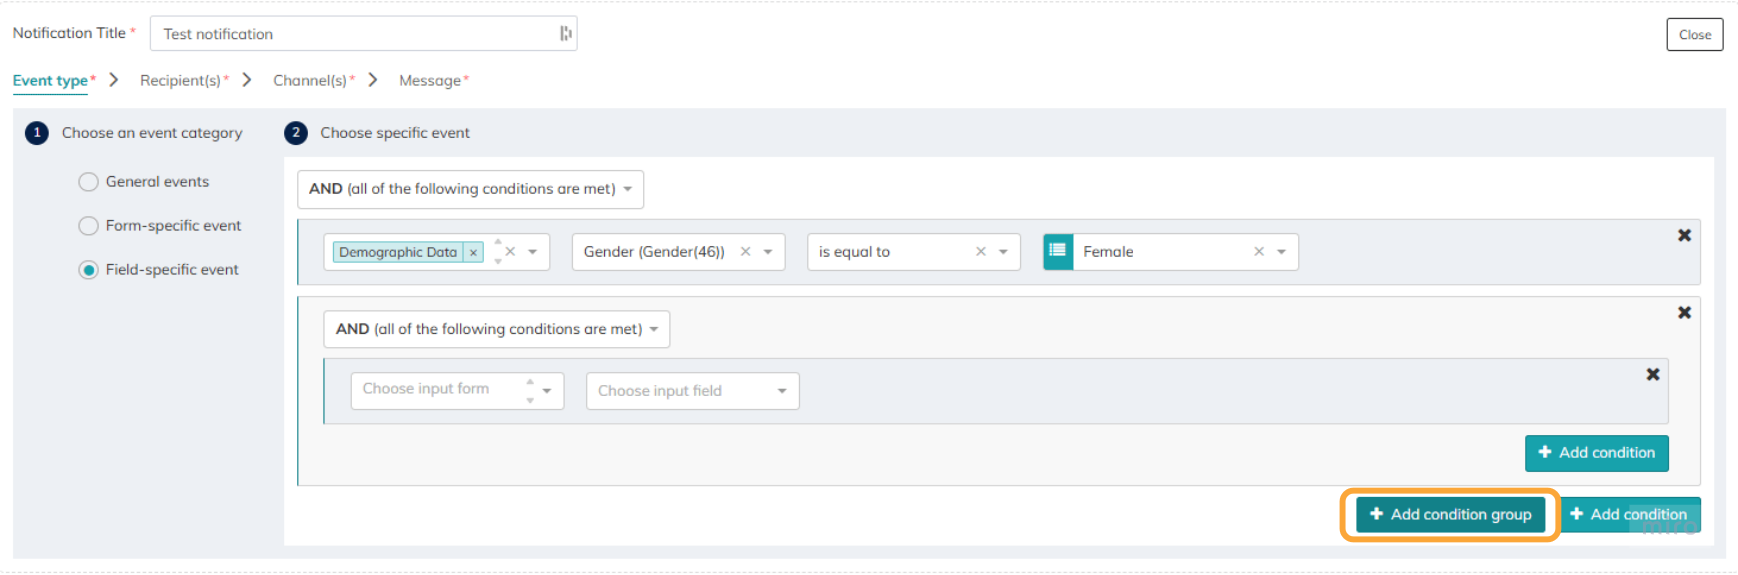
You can add additional conditions to notifications. When setting up these conditions, decide if you want to be notified when all conditions are met (AND condition) or when at least one condition is met (OR condition).
For field-specific events choose whether you want to set a condition or condition group.
- A condition is based on a single field and condition rule you define.
- A condition group enables you to combine multiple condition rules by nesting them within a second-layer operator, allowing for more complex and flexible logic. This is helpful if you want to set an AND/OR dependency (e.g. condition 1 AND (condition 2 OR condition 3) have to be met).
Regardless of how many conditions or condition groups are configured, a field-specific notification uses one message template and sends one email. The conditions that triggered it are listed in the message via the {{conditions_summary}} tag, which renders a flat bullet list — one line per condition, with field, comparison and form.
- OR Condition (any of the following conditions are met): only the conditions that were actually met are listed in the summary.
- AND Condition (all of the following conditions are met): all conditions of the group are listed, as all of them must be met.
Conditions inside a condition group appear in the same flat list; the nesting is not shown as indentation.
⚠️ Important: Notifications created before version 4.14.0 keep their previous behaviour — a separate message per condition, with subject and body combined by an "AND" — until they are migrated manually. In those studies, a "Single message template" switch is shown on the message step. As long as it is off, the old behaviour described above applies; switching it on opens the single message editor with the new default template. |
✉️ Still have questions? Feel free to contact your Customer Success Manager or email us at support@climedo.de. |
Was this article helpful?
That’s Great!
Thank you for your feedback
Sorry! We couldn't be helpful
Thank you for your feedback
Feedback sent
We appreciate your effort and will try to fix the article